16 Selective French Braid Hairstyle Tutorials
We understand your busy life with the tantrums that your hair throws at you every day, they look good when you decide to stay at home and they change the moment you step out of your house.If your hair looks good you can probably deal with anything that comes on your way, and making your hair look good all the time is a real struggle, but we have got some quick and easy to do hairstyles, which will not only make your look good, but also save your time and make you look stylish. Without taking your precious time, LET’S GET STARTED
Upside down French Braid with Knots
Watch this video for more helpful hints.
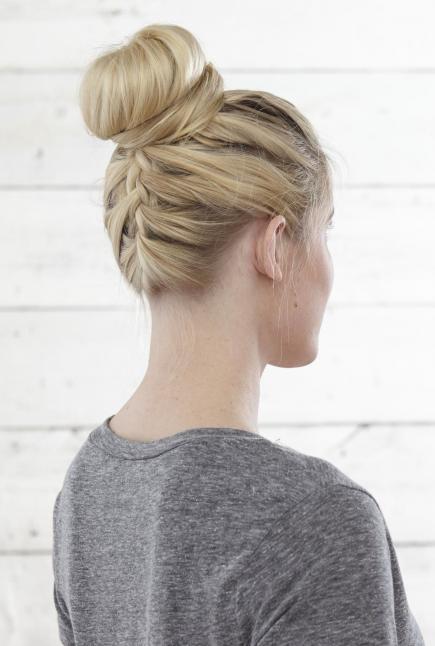
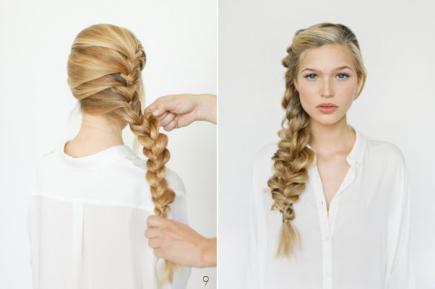
French Braid Chignon
So, our next hairstyle is french braid chignon, here is the process of this hairstyle:
- Part your hair from the side.
- Start making a french braid, start it from the front and continue it till the other side of your hair.
- Now,pin it up with a bobby pin to secure the braid carefully.
- Next step is to tease the loose hair and roll them up.
- Secure the hairstyle with bobby pins.
You can add hair accessories to highlight your hairstyle, watch the full tutorial given below for no confusion.
Tutorial: The Every Girl
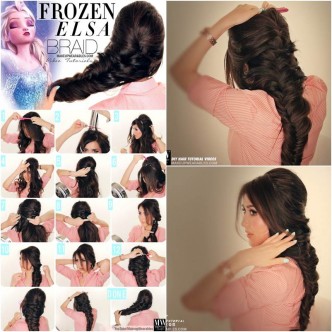
Frozen’s Elsa French Braid

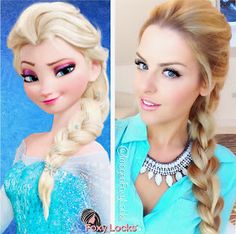
Frozen ~ What is worth melting for? definitely this hairstyle.
This hairstyle of Elsa,the famous disney character we all really adore, the process to this very cool hairstyle is:
- Part your hair from the side.
- Start making the french braid from the side, make sure your start it from the front.
- Continue making the braid, till the end.
- Secure it with a rubber band.
If any confusions, click on the tutorial given below:
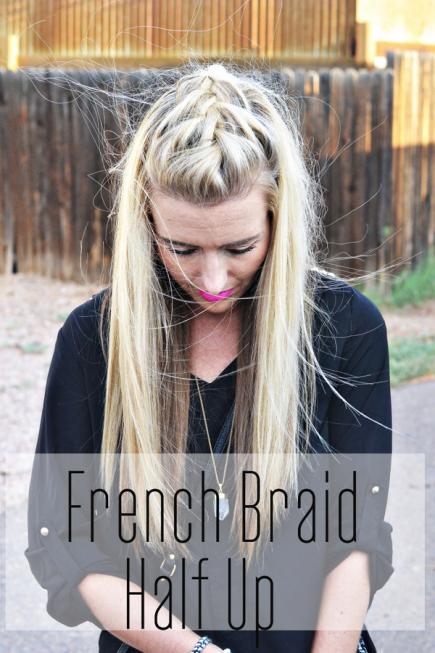
French Braid Half Up
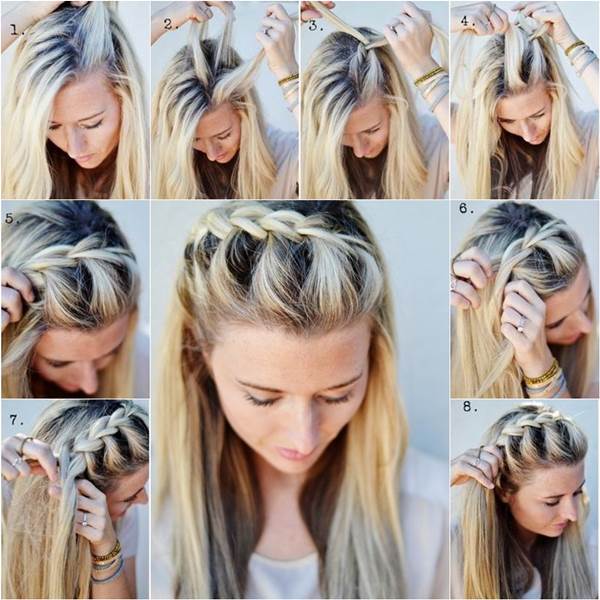
Moving on further to our next hairstyle that is “French braid half up”
- Part your hair from the side.
- Start making braid from front.
- Continue the process of making the braid till you reach your ear.
- After reaching to your ear, use bobby pins and secure the braid at the back of the ear.
This is not a full braid, this is a half braid, and hair are left open.
Check out The Shine Project for DIY instructions.
French Braid Faux Hawk
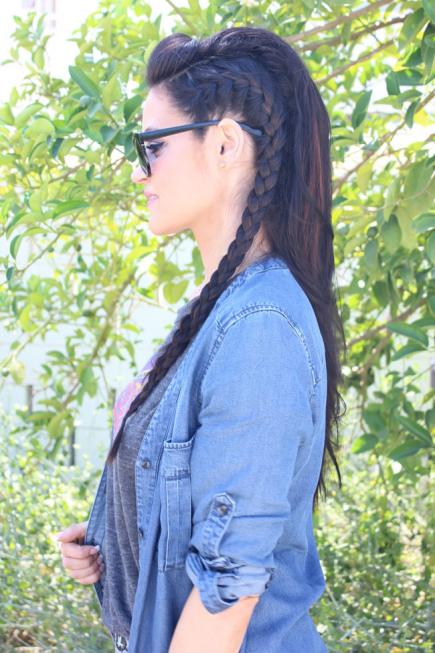
The most stylish hairstyle of all is french braid faux hawk. It looks complicated, but trust me it is really easy, you just need to go through the steps thoroughly. Read further.
- The very first step is to take a segment of hair from the top front part, clip them at the back carefully.
- Now you have to apply the molding paste in front and then remove the clip from your hair.
- Next step is to use the comb and tease the roots, if you do not know how to do it, click on the link given below :
- After doing that clip that segment of hair again with the clip at the back.
- Next you have to make three sections of your hair.
- Take the first segment of hair from the side part, and make a braid then secure it with a rubber band.
- Now repeat the same step on the other side and make a braid.
- Secure the middle part hair with bobby pins and there you go.
Visit Glam Latte for a video tutorial.
Double Waterfall Triple French Braid Hairstyle
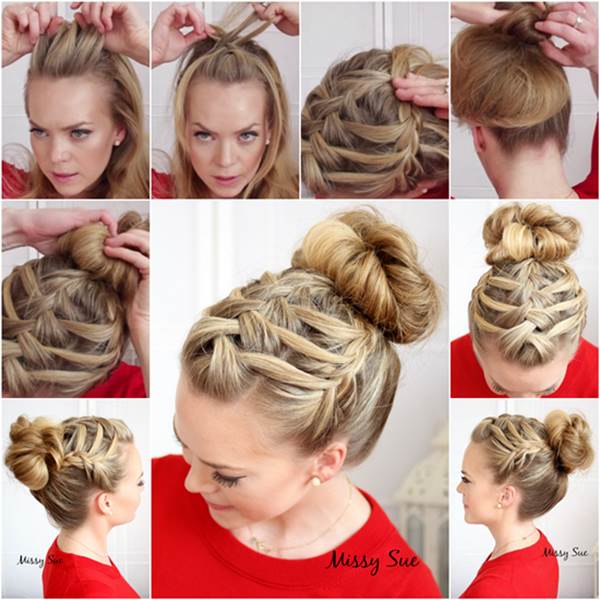
Love is in the HAIR. Our next hairstyle is double waterfall triple french braid hairstyle. We do love the natural waterfalls but this one looks amazing too. We suggest you read the steps given below and try this hairstyle :
- The very first step is to divide your hair into three segments which will be right, left and middle segment.
- Secure the two segments from right and left side with a bobby pin or clip.
- Take hair from the middle segment and start with a normal french braid and from the second stitch start making a waterfall braid.
- Waterfall braid is even much easier,watch the tutorial given below for better understanding on the process of the whole hairstyle.
- Carefully secure the middle braid down, using bobby pins or clips.
- Now, make a normal french braid from the hair on the left side, along with the strands from the first braid, and secure it with a rubber band.
- Repeat the last step with the hair on the right side of your head.
- And the last step, just make a beautiful messy bun and you are good to go.
via Missy Sue – Triple French Braid Double Waterfall.
Five Strand Diagonal French Braid Hairstyle
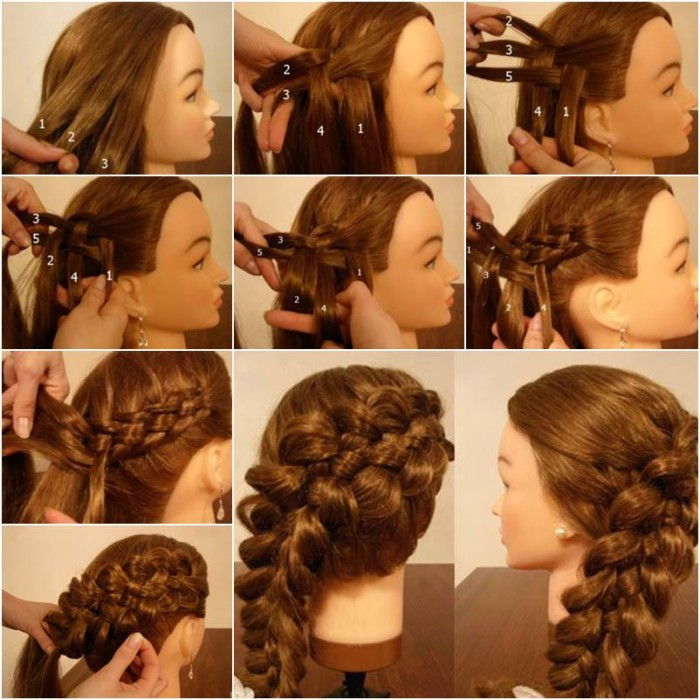
This hairstyle is different from a regular french braid that we make, because the regular french braid has only three strands, but here in this hairstyle we make a beautiful french braid with five strands that is why it is called as five strand diagonal french braid.
- Take a segment of your hair from the side of your head.
- Make three strands and two more, so total five strands, now start making a braid with those 5 strands in a particular way.
To know how to make braid with five strands please click on the link given below:
Continue the process of making the braid with five strands, make sure you do it in a way that the braid is diagonal.
Also, do not forget to secure your braid with a rubber band.
Stylish Waterfall French Braid Hairstyle

Normal waterfall braid
So, the first one is a very normal waterfall braid. Read how to do it:
- Take a segment of your hair from the front side of your head.
- Make three strands from that on segment.
- Now, start making a normal braid, but leaving one strand of your down, and replacing it with a new hair strand.
- Continue that process that reach almost to the other side of your head and then simply secure it with bobby pins.
If you feel it is complicated here is a video to help you out :
Feather waterfall braid
This braid is a combination of normal braid and a lace braid.
Take a section of hair from the front side of your hair.
Make the first stitch of normal braid and then second stitch of a lace braid and then again normal stitch and lace stitch…
The lace stitch is basically adding hair strands only from the left side and leaving some hair of that strand on the other side, which we call the feathers of our hair. Am I confusing you? i think so…click on the video given below for better understanding.
Continue this till your reach the other side of your head.
You can finish it with normal a braid and just secure it with a rubber band or elastic.
Ladder braid
The last but not the least braid tutorial we have is of a ladder braid.Follow the steps given below to make a ladder braid.
- This braid is just continuing the feather braid that we did in the last tutorial.
- So, after making the feathers braid, start making a lace braid below the feather braid.
- The lace braid is adding hair strands from the left side only, so add those feather strands.
- To know the fun affect which creates a ladder thing in the braid, watch the tutorial till the end which is given above.
- Continue the process till you reach to the other side of your head.
- You can finish it with a normal braid stitches and just secure it with a rubber band or elastic.
Thank You so much for reading, hope it was useful for you.