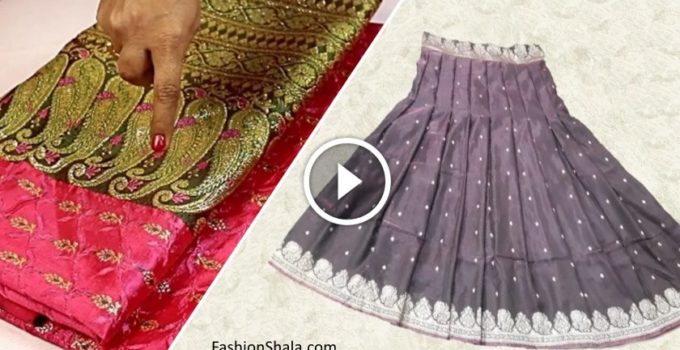
How to Make Lehenga From Old Sarees
We have been listening to the old sayings of which one includes “old is gold” but if we hear the new sayings it says that “new is diamond” which everyone prefers over the gold.
So let’s create a diamond from the gold. Well it doesn’t sound easy right? But with these following procedures it will be your right hand’s business.
Turn old saree into lehenga
Let’s take a look on the following steps to give an extra charm to our vintage collection:
- Take any vintage saree (be it of your mom’s or your grandmother’s).
- Cut 3.5 meters from saree and for blouse we will take pallu (veil/dupatta) side.
- We will cut the border of our dupatta for crop top purpose and the rest dupatta will be for blouse (the other rest will be for sleeves).
- Now we will take rest of the saree and will fold it (the measurement for the length will be completely based on your choice) we will leave 2 inches from the top to ensure that for belt purpose.
- We will draw a line (to the length) and then we will cut the remaining part for the belt from the saree.
- We will now see how to have pleats in our lehenga or you want it to be anarkali, straight type (if your saree has a border cut that off in order to get a proper shape and pleats).
- To get pleats we will leave first 2.5 inches from the edge (for zip purpose).
- To get pleats we will mark our inches, it depends on your height (normal: 5 inch, tall: 6 inches) we will mark it downwards and from the waist side too (repeat till end leaving 2 inches gap after every pleats).
- We will then start folding the pleats one after the other.
- We will take a cloth stripe now with more broad width (mark it also according to your waist’s size. Keep extra margin always).
- Now for the already marked points for pleats we will stitch it and leave that extra 2 inches after every pleats.
- We will now take the lining cloth of 2.5 meters (keep one inch extra).
- Cut lining in a slanting line not straight line so that our pleats don’t make a heavy look (leave stitching margin always).
- We will stitch the lining now from one side and then we will place our saree which we have already pleated and stitch pleats one after the other.
- Then now take a cloth stripe for our zip and will place it at one open edge side from other side we will also fold the gap we already left and then stitch it.
- We will then take that extra cloth we has cut for the belt and then will double stitch it after that we can put elastic in it or cloth string or you can put hook and lock depends on whatever is feasible to you.
- After all this stitch your lehenga till down first and then the lining (as they should be stitched separately).
Read more: Gorgeous Pics of sri lankan wedding saree blouse designs
Another ideas of transform old saree to designer lahenga
Let’s now see another easy breezy steps to give a fresh look to the old saree:
- Take an old saree and cut from it the pallu (Veil/dupatta) side.
- Then mark the length (do it according to your height or your choice).
- Leave inches even for the belt and mark it.
- We will cut off from the saree the belt portion.
- Then mark saree from back side one downwards of 2 inches and 6 inches from upside (remember
- inches will vary depending on your length and height and even on your choice).
- Mark 10 inches from our saree (if it’s the extra cloth).
- Stitch the marks now of the pleats leaving 2 inches gap one after another.
- Stitch now the opening sides of the saree.
- The border we had cut already we will now use that for belt purpose and we will stitch it.
- We will stitch it with the lehenga and then put a good finishing cut on the lehenga.
Read more: Latest Ball Gown Flower Girls Dresses for Wedding Party
How to cut Anarkali Lehenga from net saree
Let’s go on making another intriguing design from a net saree to have that warm ethnic and fresh lehenga:
- Take a net saree and we will take cloth for lining and another cloth for piping (length may vary upon your height).
- We will differ in size of pleats we will make on saree and pleats we will make on lining.
- Mark diagonally 2.5 and 7 inches on buckram from upside and opposite from downside.
- Cut out the extra part from buckram and even the marked points.
- Now mark for the inner pleats as well which will be varying according to your own length.
- We will again diagonally mark the width for pleats and leave a gap for stitching purpose.
- Then join the small pleats with the bigger ones and will go on adjoining every pleats.
- Fix saree on it (always mark if you extra cloth just cut that).
- Then fix first bigger pleats and then smaller ones and we will put lining on the smaller ones and do the same with the lining and stitch them.
Hope you guys liked these ideas keep reading such interesting stuffs only on FashionShala.
You’ll also like:


About Author
khaiza
Khaizraan Javeed, is a content writer at Fashionshala. She writes articles about the ways and means to keep common masses updated about the fashion and the ways one can learn about fashion sitting at home. She is a student of English literature and words and metaphors forms her best friend. She used these metaphors to make fashion metaphorically beautiful.