Bridal Back Neck Design Cutting and Stitching Tutorials
Everyone wants a unique style to flaunt. One wants to stand apart fro the crowd and when it comes to fashion or anything we see how people choose to set a benchmark by their own thing style.
As already set by Lauren Hutton: Fashion is what you’re offered four times a year by designers. Style is what you choose. So creating something or choosing by yourself is in itself a very different and a creative thing to do.
Beautiful Back Neck Design For Blouse/Suit/Kameez Cutting and Stitching
As we see people indulging into DIYs we have got your back to flaunt your unique style by just following these simple steps:
- First we need to take a buckram fabric and double it, you should mark the width and length according to your own blouse size then after marking you should mark another point for the neckline, for depth mark it on another edge (if you like it deep then mark 2 and a half inch or if you want to go with normal mark 3 inches).
- Mark both the edges and join them by a straight line, from one edge mark half inch and then draw a dotted lines making S shape. Mark again from the top almost 2 inches gap these dotted line making the same S shape. Then from below edge mark 7 inches and join it with the intersecting section at the middle with a semi circle shape. And from below also make a little semi circle shape.
- Now we will cut all these lines with a scissor and we will place each section accordingly. We will then place it on a cloth and will cover it from the edges of the cloth and we will cut a mark where our depth of the neck lies and after it we will stitch the cloth from all the sides.
- We will overlap the cloth and mark it in the middle a straight line and will mark a short cut on the top of this line.
- Now take another cloth to cover its back and will fold it, then we will mark a straight line in the middle and similarly cut a short cut on the top of the line.
- After all this we will place both the clothes on each other where the lines in the middle portion will overlap on one another and we will stitch it till the depth of our neck and then again stitch our neck design from all the sides.
- We will afterwards cut the neckline’s shape and mark small cuts while keeping in care that our stitches remain intact.
- Now put the cloth on it and then finally from the back side stitch it from all the sides. Now go on our next designs.
- Place them on two clothes (one for piping) and will stitch just two sides after that cut the extra remaining cloth and place short cuts on the remaining part and stitch it. Stitch now all the sides and then cut the remaining.
- Take another cloth and we will stitch the both sides of it by keeping the lower cloth a bit ahead of it for the case of piping on the neckline.
- We will now mark another dotted lines and will take another cloth and will place it 1 inch after the previous cloth and stitch it again from the both sides.
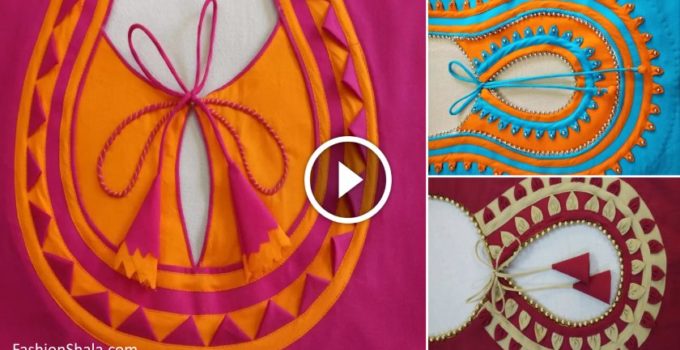
- Take another cloth and cut it in a square shapes and fold them making them look like a triangle shape by doubling it and then we will place them on the blouse design which we have already stitched and again stitch the triangle designs on it.
- We will fill all the necklines by these triangle designs, one after another and stitch them similarly. Remove the stitch on the outer side which we did just to make sure the designs didn’t have any loops and now we will also cut the shabby part of the triangles we have placed on the design.
- Now again take another cloth and do the same step as we did previously by placing it again on the end of triangles shape and stitch it both sides.
- Now we will take our remaining designs and mark on it a leaf shape on it and then we will place it on the same another cutting so that it will have the same leaf impression. And now we will mark the center of our blouse with straight line. And place our designs on it both sides.
- We will stitch it on the blouse now and will take two cloth string and place it on the top of the leaf design and we will stitch it all the way down the leaf shape and join it with the another leaf and tie it making a butterfly pattern. Our blouse is ready.
Useful Read: Trendy designer kurti style | New pattern kurtis
Bridal Back Neck Design For Blouse/Suit/Kameez Cutting And Stitching
Let’s now look again to another similar DIY designs:
- We will again take a buckram fabric and fold it and mark all the marks (length, breadth, and depth) and join them.
- Now from one edge we will mark a 4 inch mark and join it with the straight line in the middle and mark a semi circle also in the other section too and mark the same design on the upper side.
- We will now cut the designs by the same shape and will place it on the cloth and stitch it and afterwards cut the cloth with the same design and then again stitch it from all the sides.
- Take another cloth and will mark it in the middle a straight line and will mark a short cut on the top of this line.
- We will now take another cloth to cover its back and will fold it, then we will mark a straight line in the middle and similarly cut a short cut on the top of the line.
- After all this we will place both the clothes on each other where the lines in the middle portion will overlap on one another and we will stitch it till the depth of our neck and then again stitch our neck design from all the sides.
- We will afterwards cut the neckline’s shape and mark small cuts while keeping in care that our stitches remain intact. And cover it with the whole cloth.
- Now we will take another cloth stripe and cut it into square shapes then folding it into a triangle shape and then by pinching it from below it will turn into a leaf shape and place them with little gaps on our design.
- We will again take a cloth stripe and place it on the leaf designs by covering all the shabby side through stitching and will take another cloth stripe and fold it and will place it on the end of out design and stitch it all the four ways.
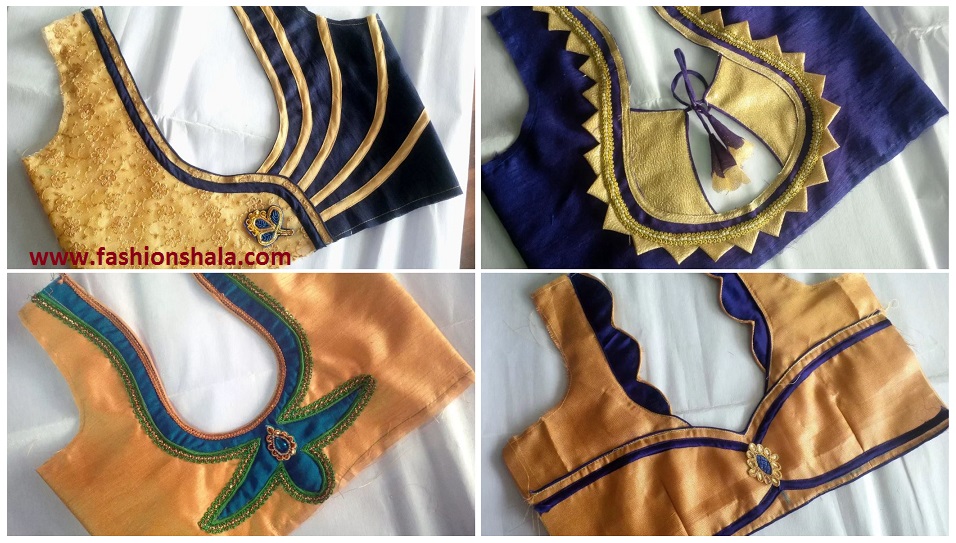
- Take another cloth stripes of different colour and we will place it on the stripe the similar way we made our leaf designs and we will stitch them. (Cut the shabby part)
- Similarly taking another cloth stripe we will place on the ends of the leaf and then we will take cloth strings (place it on the top edge of the design).
- We will take now a lace of pearls and place it on the upper design and we will tie the cloth strings the butterfly shape.
Useful Read: Blouse Neck Designs Cutting and Stitching – Tutorial
Bridal Back Neck Design for Blouse/Suit/Kameez Cutting and Stitching
Let’s go on doing the another intriguing design:
- Following again the same steps as above: taking buckram fabric (double folded) and marking accordingly your size.
- Making a straight line from the depth marks. we will then from one edge mark 10 inches and mark 5 and half inch even in middle. Join it with the straight line upwards (remember your inches may vary according to your size and your choice).
- We will make a C shape from 10 inches and from the remaining side even.
- Now mark a curve on the second portion and will leave half inch marks and on the top. Now mark the same curve. Then finally we will cut the designs according to the shapes.
- We will now place them on the cloth and mark the cut on the depth side and then will stitch it up from all the sides.
- Take another cloth and will mark it in the middle a straight line and will mark a short cut on the top of this line.
- We will now take another cloth to cover its back and will fold it. Then we will mark a straight line in the middle and similarly cut a short cut on the top of the line.
- After all this we will place both the clothes on each other where the lines in the middle portion will overlap on one another stitch it till the depth of our neck. Then again stitch our neck design from all the sides.
- We will afterwards cut the neckline’s shape and mark small cuts while keeping in care that our stitches remain intact. And cover it with the whole cloth and press the buckram and stitch it on the cloth.
- Now the take rest designs of buckram and place it on the cloth and then stitch them and finally cut the remaining extra cloth (according to design).
- We will then take a cloth stripe and fold it from one side only and then stitch it with the design.
- Take another cloth stripe and cut it in square shapes first then make two triangles and then fold it like we do while making an aeroplane. We will then place it on the first cloth stripe and stitch it from all the sides.
- We will take another cloth stripe and place it on the blouse’s design and then fold it from both sides one by one and then stitch it. Put another stripe and do the exact same thing as done with the first stripe but stitch it from one side only.
- Take another cloth stripe and cut them in square shapes and then fold to make double triangles and then fold them making like an aeroplane and then place it under the second cloth stripe and stitch it all over.
- We will now mark both designs in the middle by folding them. Then we will place the design on up of the blouse and stitch it.
- Now take a pearl lace and put it on the edges of our first design’s and of on the second one’s even.
- We will now take a cloth string and tie it on the top edges from both sides and then to give a more enriching look you can add on pearls on the leaf like designs.
Hope you liked these designs. Keep reading religiously FashionShala for other intriguing articles and tutorials.
Sleeves Design Tutorials for Blouse, Suit & Kameez
You’ll also like:

About Author
khaiza
Khaizraan Javeed, is a content writer at Fashionshala. She writes articles about the ways and means to keep common masses updated about the fashion and the ways one can learn about fashion sitting at home. She is a student of English literature and words and metaphors forms her best friend. She used these metaphors to make fashion metaphorically beautiful.