Beautiful Arabic Mehndi Designs
Mehndi! What can I say about this?? Let’s just say it is that simple thing that enhances the beauty of your hands. Most of nowadays feel that it is so old school. Well, I say, old school, maybe yes, but nothing has been introduced to date that can beautify your hands as this.
This extraordinary culture has just been limited to weddings and festivities. We do not find people embracing this culture so often at present. We recently spotted our celeb brides wearing mehndi during their marriage ceremony.
On that note, people feel that mehndi culture is most popular in Southeast Asian countries, namely India, Pakistan and Bangladesh. But not many people are familiar with the fact that this art has gained immense popularity in the Arab countries as well as the Middle East.
In this article, we will share with you some very beautiful Arabic mehndi art designs. You will be surprised to see the variety they have. We will also share some video tutorials so that you can replicate these designs at home. But before that, let us see some of the popular designs.
Beautiful Arabic Mehndi Designs Tutorial
1. Floral charm:
Florals are not only a popular motif for outfits, but they also seem to be quite popular in mehndi art as well. The Arabs must love this pattern so as to incorporate this in mehndi design.
2. Wrist art:
This design mainly focuses on the wrist, accentuating the wrist area. The peacock motif is a very popular choice for this art.
3. Lattice art:
This design mainly depicts religious motifs like a traditional mosque or Islamic places of worship. The Arabs prefer this design mainly during marriages.
4. Backhand art:
This design mainly features at the back of your hand. In this art also the florals dominate.
5. Rose motif art:
This design features the palm of your hands and since rose is a very treasured flower in the Middle East, this is most commonly used. This design is mainly drawn during weddings and occasions.
6. Full hands mehndi art:
This is a very heavy mehndi design. This design start from the palm of your hands and ends a little below your wrists.Mainly seen on the bridal hands this design comprises of peacock and fish motifs.
7. Lattice with leaf motif:
This design comprises of traditional motifs along with little leaves design. This is also a very popular choice among Arabic women.
8. Finger mehndi art:
Adding a slight touch of modernity this design is mainly drawn on your fingers. If you are not a big fan of heavy mehndi designs, I assure you, you will surely love this.
9. Simple mehndi art:
Not every bride loves heavy design on their hands. This is a subtle design which covers just a little of your palm and maybe 1 or 2 of your fingers. This is a trendy art among Arab women.
6. Shimmer mehndi art:
Every women loves a little touch of shimmer. This is a subtle design with a hint of shimmer to make it more brief appropriate.
7. Half palm trend:
This is a latest design popular among Arab brides. This features only half of your palm covering your fingers with subtle designs.
8. Full hand relish:
This is a full hand mehndi delight. This awesome art is very popular among women all over the world including Arabs. This mostly covers the entire hand reaching all the way up till your arms. This is mostly seen during traditional weddings.
9. Miniature art:
This design requires immense skills. It is very artistic as well. This art comprises of the smallest of designs you could possible find. Requires a lot of time and patience, this art leaves everyone awestruck.
10. Dome motif:
A very popular Arabic motif, this design looks heavenly on the brides. Featuring some if the beautiful architectural creations, this design brings back magic to your hands.
Arabic mehndi art is an inspiration to most of the henna artist all around the world. While some of us feel that this culture is going extinct, there are still many who are working hard to keep this art alive.
Let us see some video illustrations to understand the designs better.
Subtle mehndi art
- Take the mehndi cone and start drawing from the point a little below your wrists.
- Place a dot and then draw 2 circles around it.
- Cover the outer circle with a flower petals like shape.
- Then draw the same pattern again but a little bit bigger this time.
- Draw a circle around it and fill the gaps.
- Repeat the same steps again.
- This time shade the bigger petals pattern.
- Now draw a leaf like shape and a line outside it.
- On the line draw the similar small petals pattern.
- Draw 3 big petals and some stigma around it.
- On the leaf portion draw similar pattern and fill the gaps.
- Keep repeating the same patterns in the way until you reach your little finger and ring finger.
- Keep your first 2 fingers and your little finger side bare.
- Repeat the same leaf and petals pattern covering both the middle finger and your ring finger.
- Just remember that you don’t draw the pattern all on the same side. Keep changing sides.
- You are done when you reach your fingertips.
For more information please watch the video down below:
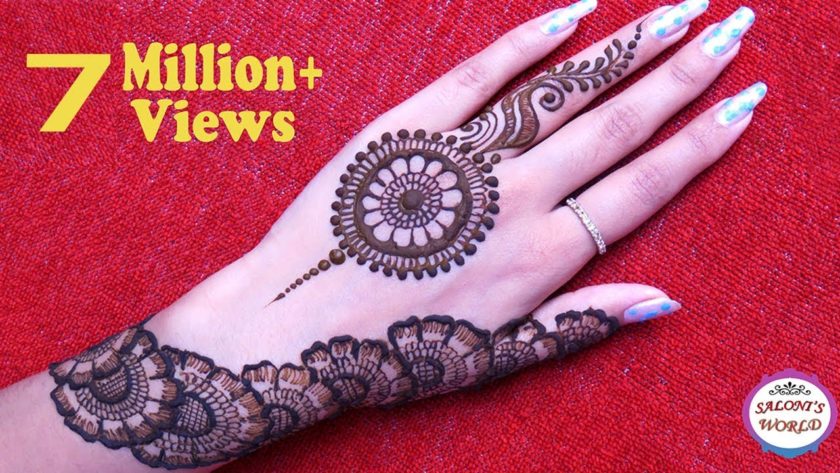
Back hand mehndi art
- Take the henna cone and start at the back if your hand.
- Make a flower shape at the back.
- Make 3 half flowers till you reach your wrist.
- Shade the petals and fill the gaps.
- Now draw the same pattern in the same way below your thumb.
- Repeat the same pattern on your thumb as well.
- Keep decreasing the motif size as you reach to the top of your finger.
- Also note that you need to start from the left side of your wrist going right up to your thumb.
- Leave the rest as it is.
- Now come the area below your ring finger.
- Draw a full flower there and a circle all around it.
- Fill in the gaps.
- Draw some small U shaped petals and place some dots all around the design.
- Draw some stigma and leaves till you reach the top.
- Place some dots in descending order just below your flower and you are done.
For more information please watch the video down below:
Floral and leaf motif
- Take the mehndi cone and start at the back of your hand 2-3 inches below your wrist.
- Draw 2 circles and on the inner circle draw some vertical and horizontal lines.
- Next draw some petals and an adjoining leaf on the left side.
- On the ride side draw another leaf pattern and two thick lines over it.
- Then make a half flower and shade the petals.
- Draw 2 more flowers on each side of the main flower.
- Then keep repeating the same pattern till you reach your first 2 fingers.
- Draw the design all over your index and middle finger.
- Now go down again and start shading your outlines.
- Make your outlines darker and your shades lighter.
- Fill in any gaps as you please and you are done.
For further illustration please watch the video down below:
Festival mehndi designs
- Take a mehndi cone and start 2-3 inches below your wrist.
- Draw 2 horizontal lines and another 2 lines 1 inch below the previous one.
- Draw some small U shaped petals and adjoining leaves.
- Now draw some small U shaped petals on the above line.
- Shade the middle area with small floral pattern.
- Now make a big flower on the first line that you created and shade the petals.
- Keep repeating the patterns until you reach the area below your thumb.
- Repeat the line pattern below your little finger and the floral pattern covering the rest of your palm.
- As for your fingers draw the lines pattern all over it and you are done.
For more detailed information watch the video down below:
Now that you have seen all these easy breezy tutorials to make your mehndi art at home, choose your favourite and create the look. Till then stay tuned to Fashionshala for more hacks and tutorials.
About Author
sanjana
Pursuing my graduation in English Major. My hobbies are reading, listening to music and you tube. I am a mediator type and I find good even in the worst case scenario.