Latest Neckline For Kameez and Kurtis – Tutorial
Kurtis or kameez are the dresses in which any Indian girl looks her best.But to stand out amongst everyone,you must be unique.And this article will show you exactly how to be unique among the crowd.Here,we will be showing you some easy collar designs for your kurti or kameez or any other dress which you can make at home all by yourself.All you need is to know how to stitch.You can make both the designs or choose any one of them.I have linked videos at the end of each procedure to make your work easier.Now, lets see how we can make these beautiful neck designs.
Kurtis Collar Neck Design
- First take a collar material, take a breadth of 9.5 inch and take the length of the material according to the length of your neck.
- Now,double fold it and mark half of the broadness of the neck on both sides with a chalk and connect them.
- Next,again mark 3 inches,7 inch(take o.5 extra) for stitching and 3.5 inch with a chalk.
- Now make a neck design of your choice(heart shaped,round shaped or square shaped) along the marks we had made.
- Then according to the marks cut it out.
- Now,adjust the broadness of the neck as per your choice.
- Take a kurta or kameez material,place the cut out neck design on the material and stitch it.
- Now,cut the cloth material according to the stitched design leaving 0.5 inch.
- Then,fold the 0.5 inch cloth and stitch it again.
- Next,double fold it and make a small cut at the top and mark the centre with a chalk.
- Now we will attach this neck with a matching kurti.
- Take your kurti material and make a small cut at the upper side and mark the centre after opening the double fold with a chalk.
- Now,stitch the central line.
- Next,stitch according to the design of the neck.
- Now,cut the material according to the neck design leaving 0.5 cm.
- Make small slits along the neck,fold the 0.5 cm material and stitch again according to the design in the front side leaving 0.5 inch.
- Take a one cm readymade dori and cut it into 4 regular pieces.
- In the v-part of the neck,mark every 1 cm with a chalk.
- Now,fold the doris and keep them below the just made 1cm marks and stitch them.
- Make a stitch along the edge of the neck.
- Take a cloth material for the back and cut it according to the shape of the front part of the kurti.
- Make a small cut for the collar and stitch it with the front material starting from the shoulder.
- Measure the length of the neck,take a collar material and cut it according to the length.
- Now,double fold it and stitch it from the between.
- Mark the length and width according to your body size and cut it out.
- Open the stitches and place it on another matching cloth material.
- Now,fold it and stitch it again.
- Again fold it and stitch it again along the collar material.
- Cut out the extra material,fold the cloth and stitch it.
- Attach the collar with the neck of the kurti.
- Now attach buttons or potlies on the opposite side of the loops so that we can enter them into the loops.
- Voila! Your neck design is ready.
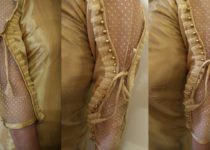
Latest Neckline For Kameez & Kurtis
- Take a collar material with width 9.5 inches and take the length according to the length of the neck.
- Now,double fold and mark half of the length of the neck on two sides and connect it.
- Then,make the design of the neck according to your choice(heart shaped, round shaped or any other shape)
- Now,mark the length of the neck taking 0.5 inch extra for stitching.
- Then,cut it out according to the mark and cut out the patterns seperately.
- Adjust the broadness of the neck as per your choice and cut it.
- Now,take a kurti material or a kameez,place the neck design on it and stitch it with the cloth.
- Now,cut it out leaving 0.5 cm cloth.
- Make small slits along the 0.5 cm cloth.
- Now, fold the 0.5cm cloth and stitch it again.
- Next,double fold the neck and make a small cut at the upper end.
- Then,mark the centre of the neck
- Take the cloth material,double fold it and make a small cut at the upper end just like we did in the neck design.
- Mark the centre with a chalk.
- Now,place the neck on the kurti and stitch it leaving 0.5 cm.
- Then,cut the extra material from the neck leaving 0.5cm
- After that make small slits on the 0.5cm left cloth.
- Fold it inwards and stitch it.
- Take a different cloth and stitch it along the edge of the neck for piping to get a beautiful finishing.
- Make small slit cuts on the piping,fold it inwards and stitch it again.
- Take any one pattern,place it on a matching cloth and stitch it along the edge of the pattern.
- Now,cut out the extra cloth leaving o.5 cm on the top and 0.5 inch on the bottom.
- Place on the pattern on another colouted cloth and atitch at the edges.
- Now,cut out the extra cloth leaving a little on all the sides.
- Fold it and stitch it on all sides for piping.
- Make the other patterns in the very same way.(You can choose different colours for better contrast).
- Attach the patterns together along the edges.
- Now,place the patterns on the neck of the suit and stitch it.
- Make a stitch leaving 0.5 cm along the neck design.
- Place matching buttons on the patterns according to your choice.
- Voila! The second design is also ready.
Thus in this way, you can turn your regular kurtis into a unique one by adding a beautiful design at the neck and be the face in the crowd.If you follow my tips along with the video,you can easily make these designs at home all by yourself.I hope these tips had helped you.Stay tuned for our next update. Till then stay fashionable.